Tuesday, May 21, 2013

Recital Reflections

Okay, I think it's time for a normal life post (not that my life is normal... haha). Last Thursday night was a very momentous, fun, and exciting event: my last piano recital. I have taken piano lessons for nine years from an amazing, godly woman in our church, and the Lord has opened up to me an entire new world through music. It's like learning to read: once your know the basics, you can find out anything you want to know through endless books and resources. In the same way, once you know how to read music, you can play anything, and it is so thrilling!

There were thirty students in the recital, and I got to play three times. Once was a solo piece, Fantasie Impromptu by Chopin. I have always dreamed of being able to play it, but didn't imagine I'd be able to play it so soon. In September, when I started learning it, I wanted to give up and play something easier. But Mrs. Briggs gently pushed me on, and sure enough, through many excruciating hours of practice, I learned it!


I also played a duet of Yankee Doodle with my sweet student, Kameran. This is her first year, and I was so proud to see her playing so perfectly in front of so many people!

And, I played a duet with Mrs. Briggs that was a combination of Shout to the Lord, Lord I Lift Your Name on High, and Great is the Lord. It was so glorious to magnify the Lord with music together!

After the recital, we had a celebration at my house with some friends and family. We had a campfire, sang along to the guitar (not me playing... I fail at that! lol), and walked out in the woods in the pitch black of night! I couldn't get any pictures because it was so dark, but it was so much fun. I didn't want it to end! And, my parents blessed me with a dozen beautiful red roses as well.

 I am so thankful for the years of lessons and eighteen recitals to remember over the course of them. And I will NEVER stop learning when it comes to piano!

Tuesday, May 14, 2013

Natural Beauty Products: Edible Foundation!

I have another easy, inexpensive natural beauty product for you! And the fun part about this one is that you get to actually make it. Today I am going to tell you about my discovery of homemade foundation powder!

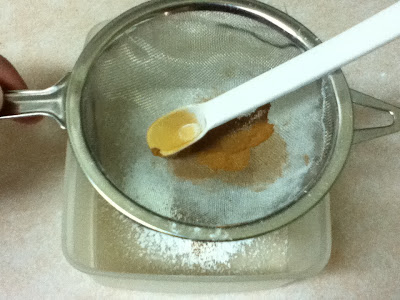
I did some Google searching searching and found a variety of ideas, so I combined them to formulate my own recipe. All you need are three common ingredients: Corn starch, cocoa, and cinnamon.

 Some of the recipes I found online required tings like arrowroot powder and French green clay, and granted, using those ingredients would probably make a better product. But who has those things lying around their house? What I love about this recipe is that it's all common ingredients.


Now, I was a dummy and I forgot to wrote down the proportions I used, but I *think* I used 2Tbsp. corn starch, 1/2 tsp. cocoa, and 1/4 tsp. of cinnamon Of course, your skin tone will be different (mine is quite light), so experiment til you get it just right. :) You can start with those proportions and add more of whatever you need to get the right shade. Cinnamon helps give a more rosy tone, and cocoa is good if you are more tanned.


When you mix it together, it helps IMMENSELY to have a sieve to push the ingredients through so that there are no lumps, especially since cocoa and corn starch tend to clump.  If you don't have one, you can press the lumps with a spoon to get them smooth, but it's a lot more work.

And the end result will be a smooth, delicious smelling, super-soft make-up powder! I store mine in a container that used to have sprinkles in it - you can also use pill bottles, baby food jars, tupperware containers, etc.

Before I apply it, I dab my finger in my secret weapon, olive oil, and spread a VERY thin coat of it over my entire face to make the powder stick better. Tapping your brush on the side of the container or the cover before bringing it to your face will help keep excess powder from poofing all over, too. (Firefox is telling me "poofing" isn't a word. Well, I think it is!) Also, I use my finger to dab on extra powder around my eyes or on blemishes so that it's more concentrated in those areas that need more coverage.

Oh, and I should tell you that this powder will only give a very light concealing and evening effect - not like thick, store-bought make-up. So if you're a person who wears a lot of make-up, you probably won't like this. But yeah. I am LOVING it and using it every day! t goes on easily, comes off easily, costs peanuts, smells great, feels great, lets your skin breathe, and best of all, you can feel confident about what you are putting on your body. Enjoy!

Saturday, May 4, 2013

Natural Beauty Products: Olive Oil

The past couple of weeks I have been on a quest to find natural alternatives to regular beauty and hygiene products - lotion, make-up, shampoo and conditioner, etc. I have not found *everything* I'd like yet, but I have gained some invaluable secrets that I am thrilled to share with you!

But first, there's the why. There are two main reasons I've been hunting down these homemade concoctions: health and cost. Regular hygiene and beauty products are loaded with a staggering amount of chemicals. Remember, your skin is the largest organ of your body - ideally, we shouldn't put anything on our skin that we couldn't eat, because it is absorbed into our bodies. Here's a good rule of thumb: if you can't pronounce an ingredient, it's probably not good for you. And the more of those ingredients, the bigger the problem. Now, I am not an only-organic/all-natural kind of person, but I am learning that these things are important, and I want to do the best I can. For example, did you know that parabens have been linked to breast cancer? And sodium benzoate has been linked to skin cancer. And those are just a couple of examples. These things are in a lot of products! I don't know about you, but that freaks me out! And the second reason: cost. If you want to get products that actually work, you'll have to fork over a pretty hefty chunk of cash, even just for the better brands at an ordinary department store. Could there be a simple-to-make, inexpensive alternative? I'm on the quest to find out!

Alright, so, here is the first awesome secret I have for you: (drum roll...) olive oil! I have found this to be a universal wonder-product. Folks, get yourselves a bottle of cold-pressed, extra-virgin olive oil. It's liquid gold. And, though it is somewhat expensive, a little goes a loooong ways, so in the end, you'll spend less.

 Here are the uses I've found for it:


1) Lotion
Rub it into your skin and let it soak in until it's totally dried. Your skin will be sooo soft! Tip: only put it on when you can be sure you have plenty of time before touching fabric (i.e. going to bed, sitting on the couch), since it will make oil stains. Oh, and also, it only takes less than half a teaspoon to coat your face, so don't get too much or it will drip and make a mess! Just dip a couple of fingers in and spread it on.
2) Face wash
 Oh yes, you heard me! Now don't close the window yet, I know what you're thinking: "No, I already have oily skin and acne. That won't work for me."
Well, news for you: so do I, and it worked for me! Believe it or not, adding the right kind of oil to your skin keeps your skins from trying to produce its own from the inside, which clogs up the pores. And, olive oil is anti-bacterial so it actually cleans and heals infected pores. My skin has cleared up and looked much more even toned since I've used it! Healthy skin is beautiful skin. Tip: Be sure to put on a head band to assure that it doesn't get in your hair, lest you look like a grimy grease ball who hasn't bathed in a week!

So there is my favorite secret so far - hope you all enjoy it!